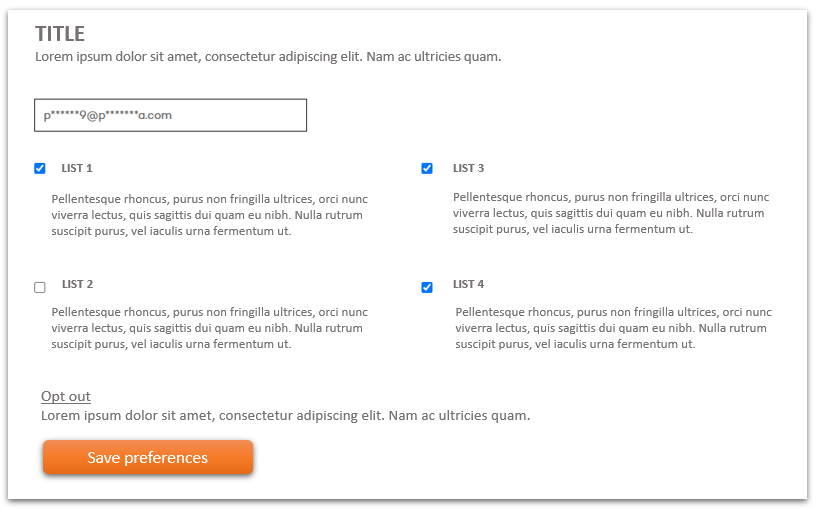
In this article we are going to explain how you can create a multi-language preference center in Pardot. This is a common theme, but little has been written about it. This kind of strategies simplifies management for companies or organizations that have a multinational activity, avoiding the need to create preference centers and their corresponding links.
Some parts are really easy to do if you have some clues, but others require a technical knowledge, at the code level. But in summary, everything we show in this image can be generated dynamically. Some of them requires a trick and, in the case of the general Opt Out, a not perfect solution but a decisive and operational one.

Specifically, the areas that have a translation option are:
- Title
- Introductory text
- List name
- List description
- Opt-out text
- Submit button
Now, we will analyze it step by step.
Before you start: define the Country or Language variable
We can follow 2 criteria to make it multi-language:
1. Make content dynamic by country
2. Do it by language
If you choose the second option, you will have to create a custom field and you will have to do an automation rule to assign language according to the countries. We recommend this second option, but each one can follow his or her own criteria. But we believe that it is more flexible and at the same time simpler, in Spanish you will encompass many countries, as well as in English, and on the other hand, if you want to add the user’s preference for language within a country, as is the case of Spain, you could also do it.
Title and introductory text
To include a dynamic Title, it is better to remove the title from the LAYOUT TEMPLATE and add it on the Preference Center page itself. There, in the FORM CONTENT – Before form content box, you can include your dynamic content. In this video you can see where ….
{% video_player “embed_player” overrideable=False, type=’scriptV4′, hide_playlist=True, viral_sharing=False, embed_button=False, autoplay=False, hidden_controls=False, loop=False, muted=False, full_width=False, width=’800′, height=’430′, player_id=’31575164242′, style=” %}
Basically, we create a dynamic content by default, and others based on the field that we have created Language. You can add as many as you want. Then you add that dynamic code on the preference page in the “Before form content” area. If you want to add more things there, you can do it.
List name and description
In order to create these dynamic texts, we need to do something a little elaborate, but this will solve the problem. To change the name, you just have to create the dynamic text and insert that javascript in the “label” of the list. You can see how to do it in this video:
{% video_player “embed_player” overrideable=False, type=’scriptV4′, hide_playlist=True, viral_sharing=False, embed_button=False, autoplay=False, hidden_controls=False, loop=False, muted=False, full_width=False, width=’800′, height=’450′, player_id=’31697316098′, style=” %}
To change the “description” is an equivalent process, you have to do it as many times as you have lists in the preference center. Here you can see how it works ….
{% video_player “embed_player” overrideable=False, type=’scriptV4′, hide_playlist=True, viral_sharing=False, embed_button=False, autoplay=False, hidden_controls=False, loop=False, muted=False, full_width=False, width=’1184′, height=’666′, player_id=’31669376829′, style=” %}
Opt-out text
This part is somehow more complicated: to change this you will need the help of a front designer. This is because, on the one hand, you will have to leave the text of the option to unsubscribe from all the lists with some generic text, such as simply Opt-out (which is understood as an international standard). And, then, you will havet to add an explanatory phrase underneath -in the preferred language- that says that to unsubscribe from everything click on Opt-out. It is the only option, which is a bit of a trick but it solves the problem. The dynamic content will have to be entered in the template of the preference center before the submit button. An alternative, if you have the unsubscribe page added in the emails (which should be mandatory), is to hide this option with a jquery.
Submit
To modify this option, you also need a front programmer. Basically it’s about removing the button that prints pardot and adding one for dynamic content. For that, you capture the code that prints from the pardot button and put it in Dynamic Content, modifying the text for each language. On the other hand, you delete the code that the button prints.
Conclusion
With all these changes, you will have a multi-language preference center, a huge advantage if you have clients with different languages.
If you have more questions or need advice about Pardot, surely we can help you…
{{cta(‘d066bfa4-948e-47d5-b61a-1f2ab4f66672′,’justifycenter’)}}


