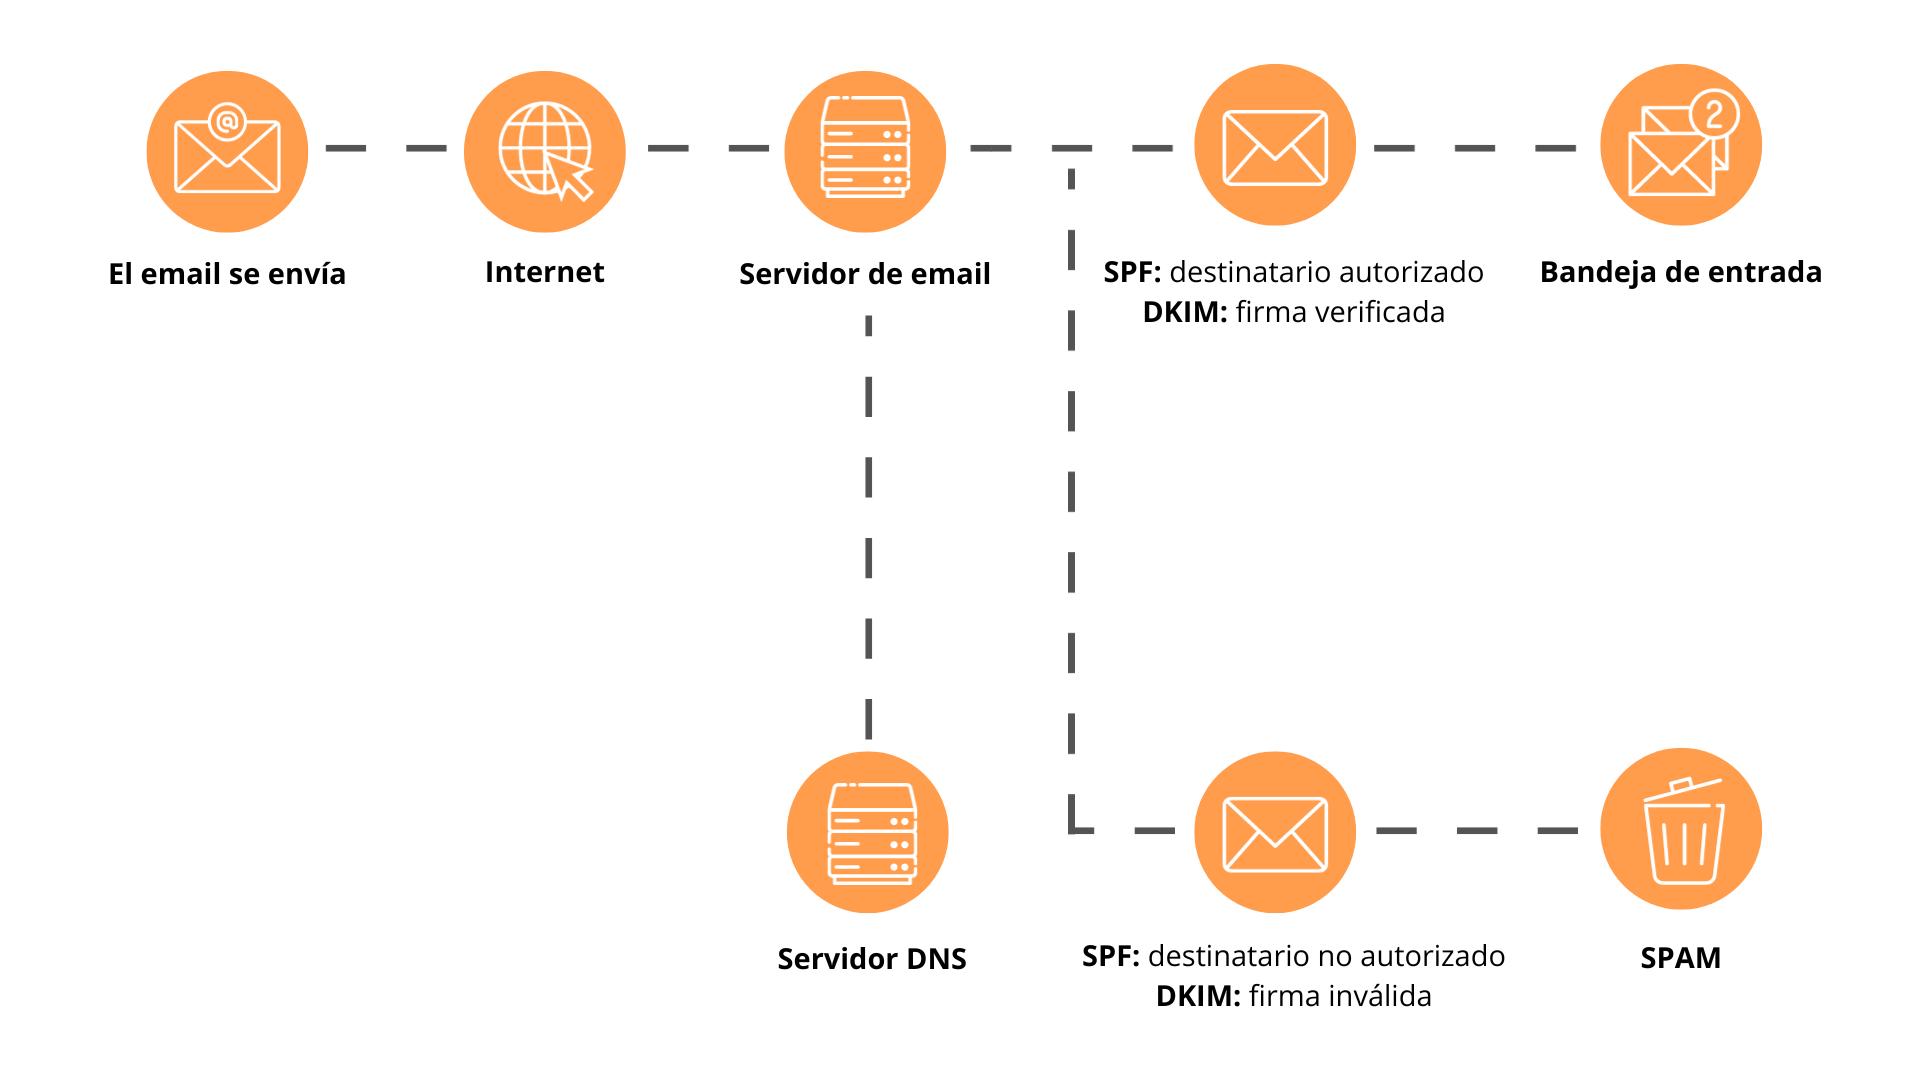
Email authentication allows companies to send emails securely . Additionally, it helps recipients’ email servers identify if an email is sent from a real account and the sender exists.
Looking ahead to 2024, if you use Pardot (Account Engagement) to send emails you must take into account the SPF, DKIM and DMARC settings. In this article we will review each authentication method and provide a step-by-step guide to implementing SPF and DKIM policies in Pardot.
Email authentication definitions
- Protocols: These were initially developed as a way to strengthen the security of SMTP (Simple Mail Transfer Protocol) and combat the rise of spam, since SMTP itself does not include authentication mechanisms. The following protocols have their own configuration and must be implemented and verified before sending emails from each platform.
- SPF (Sender Policy Framework): is an email authentication technique used to prevent spammers from sending messages on behalf of your domain . As a sender, you will be asked to add SPF records to your DNS to allow Pardot to send emails from your organization’s domain.
- DKIM (DomainKeys Identified Mail): is a protocol that allows a company to take responsibility for the transmission of a message by signing it, so that mailbox providers can verify it. Similar to SPF settings, DKIM requires a public key in DNS and the recipient’s email server will use this information to accept emails with the corresponding private key.
- DMARC (Domain-based Message Authentication, Reporting, and Conformance): is designed to allow email domain owners to protect their domain from unauthorized use (email spoofing). This protocol informs the recipients’ email servers how to treat emails that come from the company’s domain.
How does email authentication work in Pardot Account Engagement?
While SPF verifies that the email is sent from an authorized sender, DKIM authenticates the email by comparing and validating public and private keys.
Why implement authentication protocols?
There are multiple reasons to implement these protocols:
- The correct implementation of SPF, DKIM and DMARK can protect the brand image of your company, your clients and leads .
- These email authentication methods prevent phishing attempts , and mail servers may stop delivering emails that were not directly generated by your company.
- They also affect the deliverability of the email. If email authentication protocols are not configured correctly, the probability that clients will not receive them and that the email will end up in the spam folder is high.
Preparing to configure SPF/DKIM
Before starting the SPF and DKIM configuration process, you should contact your company’s IT department in order to find a list of domains available to use on the new platform to learn the process of making changes in DNS. Depending on IT policy, this may take between 2 and 4 weeks.
How to Set Up SPF and DKIM in Pardot (Account Compromise)
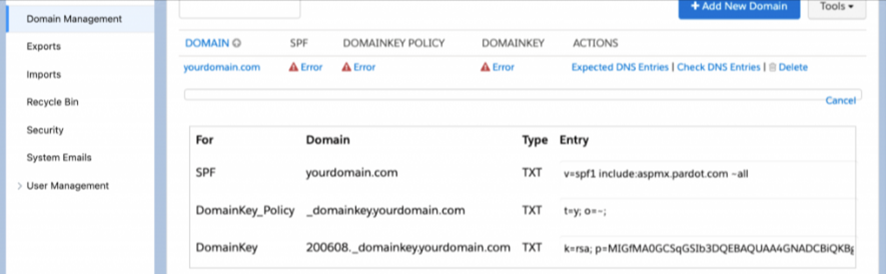
1. Go to Pardot Settings > Domain Management tab > click Add New Domain.

2. Enter the domain name > click Create Domain.
3. Once configured > click on Expected DNS Entries > copy the SPF, DomainKey_Policy and DomainKey Domain and Entry values > send to the department. of IT in step 6.
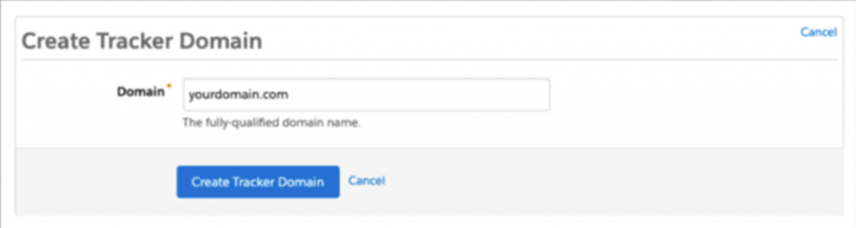
4. Optional: While configuring SPF and DKIM settings, you can also create a tracking domain and submit the request in a single ticket to the ID department. Navigate to the Tracking domains section on the Domain Management page > click Add Tracker domain.
5. On the same page, write down the validation key > send to the department. of IT in step 6.
6. Update the text below with the appropriate information for your instance and send it to the IT team.
Hello [name],
I’m working with the marketing team to implement Pardot, our new marketing automation platform. We will use Pardot to send communications to our customers and prospects from @yourdomain.com. To ensure high deliverability of email and custom URLs, we need to make the following changes:
We need to configure SPF, DKIM and CNAME so that Pardot is authorized to send emails on our behalf.
–> To configure SPF, you must add the following to the DNS entries:
o Type: TXT
o Entry: v=spf1 include:aspmx.pardot.com ~all
If an SPF record already exists in the DNS entry, simply add the following: include:aspmx.pardot.com
–> To configure DKIM, you must create DNS entries for DomainKey_Policy and DomainKey
o DomainKey_Policy
Domain: _domainkey.yourdomain.com
TXT type
Input: t=y; o=~;
or DomainKey
Domain: [insert host record here]._domainkey.yourdomain.com
Type: TXT
Entry: [insert host record here].
–> To configure the tracking domain, you must create the CNAME and TXT records for go.yourdomain.com
or CNAME
Domain: go.yourdomain.com
Address: go.pardot.com
o TXT
Domain: @
Entry: [insert validation key here]
–> Please let me know when all of these steps have been completed so we can complete the setup process within Pardot. Please feel free to contact us with any questions.
Greetings,
Marketing operations
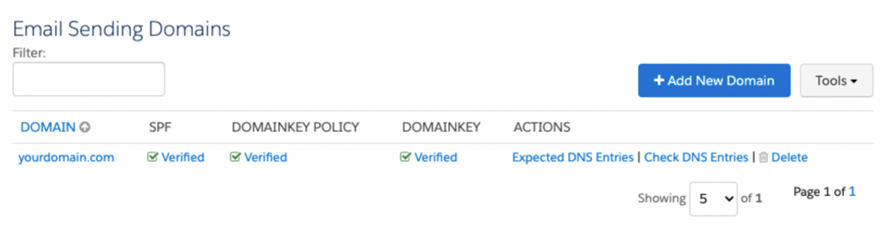
7. Once the IT team adds the DNS entries, follow these steps to validate and commit the changes.
Pardot Settings > Domain Management tab > click Check DNS Entries in the Email Sending Domains section. If the correct DNS entries are added, you should see the following screen.
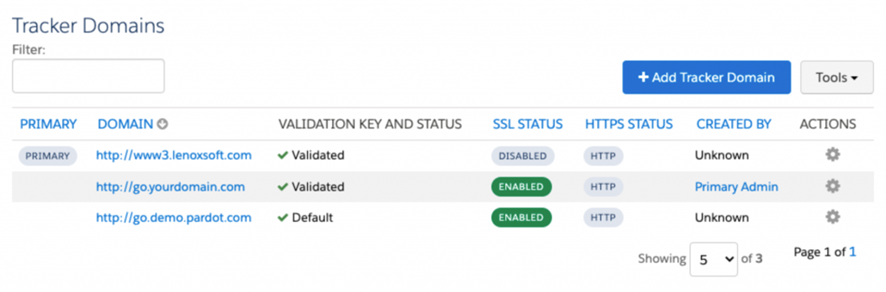
To validate the Tracker domain > click validate in the Tracker domain section. If CNAME is set correctly, we should see the following screen.
8. If the validation fails for some reason, you can use platforms like mxtoolbox.com to compare the input values you provided to your IT team with the ones they added to DNS. Enter your domain name on the following pages and you will be able to see the existing DNS entry values.
To review SPF records, visit https://mxtoolbox.com/spf.aspx . If SPF has been configured correctly, you should see v=spf1 include:aspmx.pardot.com ~all instead of v=spf1 -all.
You can follow similar steps to check DKIM and DMARC records. Alternatively, you can request a screenshot of the published DNS records from your IT team for verification.
Email authentication is an essential part of secure communication with recipients. If you’re still having trouble validating your SPF or DKIM records in Pardot, please contact us and we’ll be happy to help .
If you liked this article, you might also be interested in:
- Benefits of Calendar Links in Account Engagement
- Mapping Salesforce CRM and Marketing Cloud Account Engagement Fields – MCAE/Pardot
- How to retrieve UTMs in forms with Pardot IFRAME